
EZ-LIST is not intended to create formatted reports, but the results can be exported for you to use in other products. You can select which fields to display and filter based on criteria found in the data in each of the fields. A basic understanding of how databases are structured is required to be proficient with EZ-LIST and the utility was not created with the casual user in mind.
In the example that follows, you’ll see how to create a basic query that EZ-LIST will use to select the data.
EZ-List Example
Question we’ll be answering: What medications a consumer presently taking?
- Select Reports from the Menu.

- Select EZ-List.

- Click New.

- The Available Topics are broad areas. You’ll need to know where the data you are looking for is located; the data you need is most likely in one of the following topics:
- Attribute = Medical and Personal Attributes
- Consumer = My Profile and Personal Information
- Delivery = Service, Progress, and Case Note records
- Health Record = Medications, Visits, Incidents, Medications
- Organization = Persons, some lookups such as hospitals, locations.
- Planning = Plans, Outcomes, Objectives, Supplemental Plans, Supports
- Program = Program enrollments
- Staff = Providers and other staff members
- Click the arrow to the left of Health Record. When you scroll down, you’ll see Medications, but this is not what you want. Medications is the lookup/list of medications, not the medications that have been prescribed to your consumers. Keep scrolling until you get to Prescription.
- Click the checkbox to the left of Prescription. The Prescription fields display in the Fields section in the middle of the page.
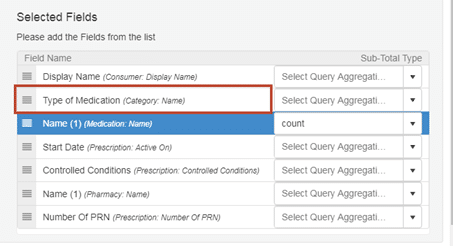
- You’ll need the name of the consumer. Click the arrow to the left of Consumer; scroll down and single-click Display Name. With Display Name selected, click the right-pointing arrow to the right of the field names. You’ll see the field listed under Selected Fields in the right column. Click the arrow to the left of the Consumer group of fields to collapse the list; you’ll find the remaining list of prescription fields easier to work with.

- From the Fields section, single-click each of the fields you’d like to view and click the right-pointing arrow to add the fields to Selected Fields. For this example, we are selecting:
- Active On (the date of the prescription)
- Name (click the arrow to expand Medication and select Name)
- Category (click the arrow to expand then select Name)
- Controlled Conditions
- Pharmacy (click the arrow to expand then select Name)
- Prescriber Medication Professional (click the arrow to expand then select DisplayName)
- In the Selected Fields section, you can move the fields up or down by clicking and dragging the field to the location of your choice.
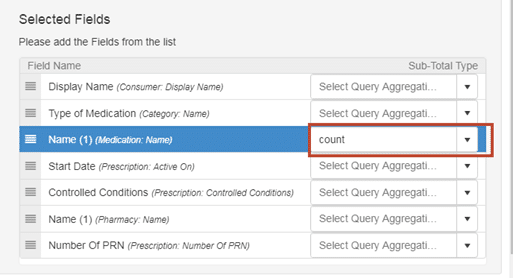
- You can rename the fields and will most likely want to. Several of the fields you’ve just selected are labeled Name but you’ll want to see what the name represents. Click the field you choose to rename. Type what you’d like for the name of the field. You must click the Save (floppy disk) button to close the field even if you decide not to make the change. Clicking the Save button is the only way to close the field. In this example, Category has been renamed to Type of Medication.
- The Select Query Aggregation is generally used for getting a count. In this example, we’ll get a count of how many medications the consumer is receiving.
- Enter a name for the query in the Name field.
- You’ll need to Run the query before you save it. From the top toolbar, click Run. Click Edit to re-open Query Properties. Then click the Save & Close drop down and click Save.
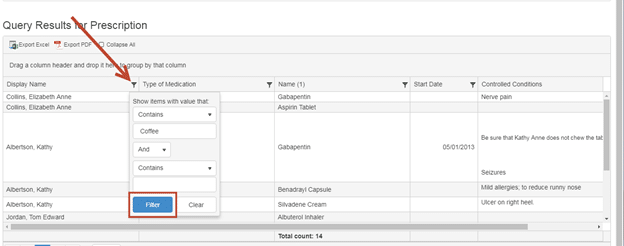
- Now that you have the results, you can further filter the query. We only want medications for consumer Chris Coffee. Click the Filter icon to the right of Display Name. Enter the name of the consumer in the blank field. Click Filter at the bottom of the filter box.
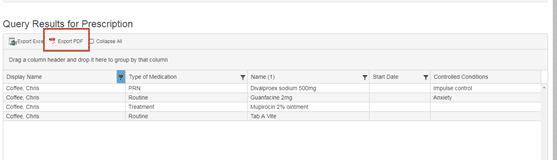
- To sort the list, click any of the column headers. In this example, I’ve selected Type of Medication.
- The list is ready to be exported.
- You’ll be able to reuse the query since it’s been saved. The query displays on the list of queries when you open EZ-LIST. Select the pencil to open.
- If there is saved filter criteria from the last time you ran the query (the filter icon will be blue), select the Filter icon and click Clear. You can then enter the name of another consumer.
- If you’d like to change the order of fields, add or remove fields, click Edit from the toolbar.


EZ-List Query Permissions
- Only the owner of a query can modify or delete the query.
- A query can only have one owner.
- Anyone can insert a new query.
- Anyone can copy a query.
- The user making the copy becomes the owner on the copied query.
- A query can be deleted by the owner but only if the query is not being used elsewhere in the system.