
Objectives can be attached to a service so providers can record progress. Providers can record progress from within Intuition Touch as well as from within Vertex Case Manager Service Sessions.
You can have multiple plans allowing you to work on next year’s plan while finishing up the current year’s plan. Outcomes and objectives are date-driven so only “active” items will display when users are entering ratings and progress notes.
Creating a New Service Plan
- If the consumer is on your caseload click anywhere on the consumer’s card. If the consumer is not on your caseload, use the Consumer Search tool to find the consumer with whom you are working.
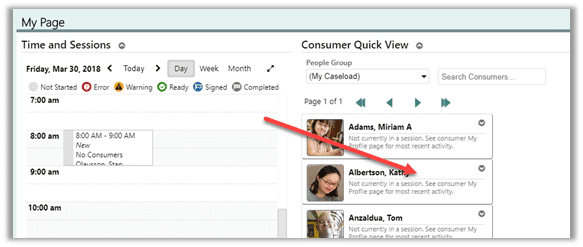
- The expanded Consumer Card displays.

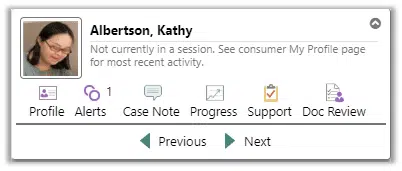
- From the expanded Consumer Card, click Profile. The consumer’s My Profile displays.
- From the My Profile page, click Life Plan on the Toolbar.

-
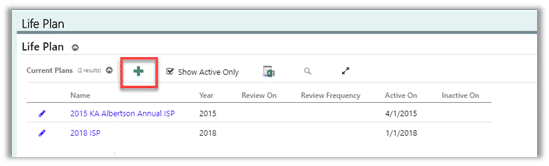
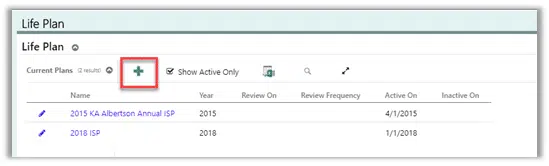
The consumer’s Life Plan page displays. Click the green plus sign to add a new Service Plan.
- Enter:
- A Name for the plan,
- The Year of the plan,
- The dates the plan becomes Active On and Inactive On,
- The Review Frequency.
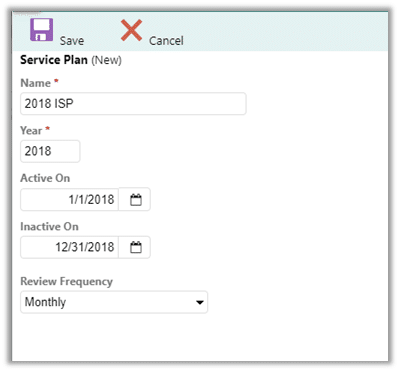
- Click Save. The service plan is created.


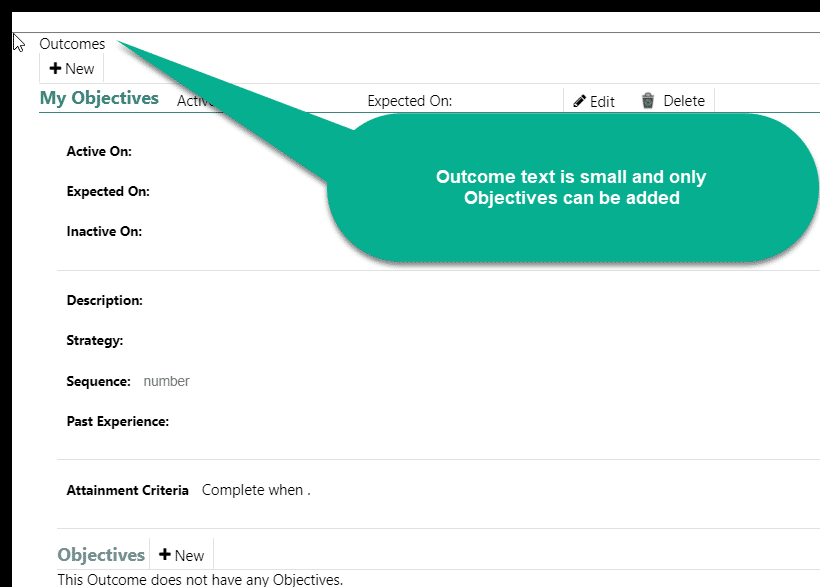
Creating an Outcome
NOTEA special feature of Vertex Case Manager lets you have only Objectives if there is no specific Outcome. If you are using what are known as Virtual Outcomes , you’ll only be able to create new Objectives.
-
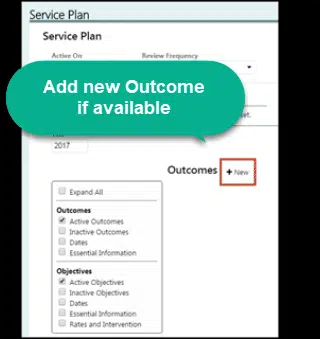
Each plan must have at least one Outcome and you can have as many outcomes as necessary for the consumer. To create an outcome, click +New to the right of Outcomes.
This is what your screen looks like without Virtual Outcomes:

This is what your screen looks like if your agency is using Virtual Outcomes:
-
If adding an Outcome, enter: • Started On and Expected On date fields. • Do not enter a date into the Inactive On field until the consumer either meets or otherwise abandons the outcome. Entering an Inactive On date prevents progress records being entered after the date.

-
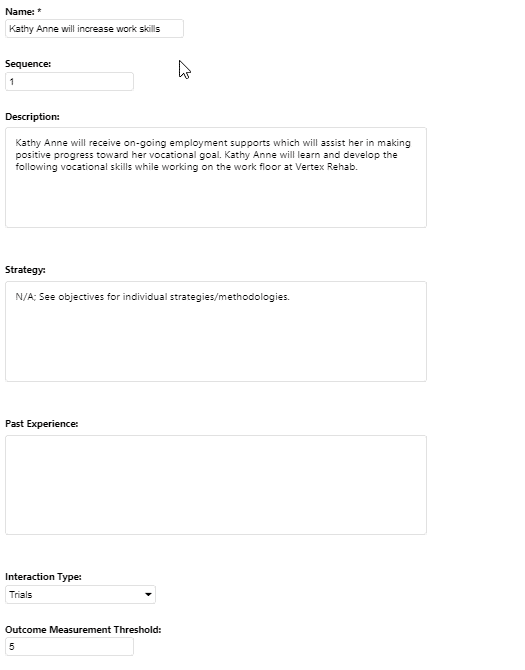
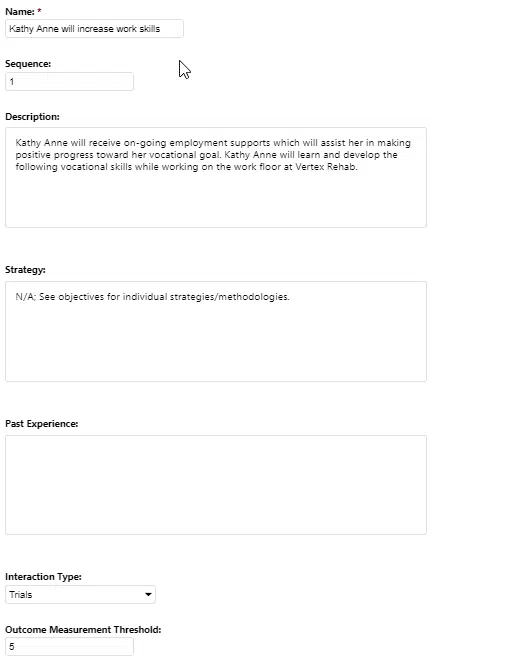
Enter: • A short description (Name) of the outcome as well as the full Description of the outcome. • Sequence to designate the order of the outcome • Strategy to note how you will assist the consumer in achieving this outcome. • Past Experience to explain why the person would like to work towards this outcome. • Interaction Type to define the method you will approach the outcome. • Threshold Measurement to state the number of prompts to use as a monitor to be considered as successful for this outcome.
-
Using the Completed when section, determine under what criteria the consumer’s Outcome will be achieved. This information is only for reference at this time. • In the example below, the consumer will be successful when the objective is met 1 time a day for 5 consecutive days. • Since an outcome can have multiple objectives, you might decide that the outcome is achieved when a specific objective in a sequence is met or when the final objective in a series of objects is met. • You can also note if the objective needs to be successful once per day or is successful on each trial attempted in a day. • You’ll need to enter the number/% of how many successful attempts should be looked for and the %/times (the “what”) and for how many Consecutive days, weeks, months, or other unit of measure that the consumer needs to be successful.

-
Click Save. Your outcome is complete.


Creating an Objective
Each outcome must have at least one objective. It’s the objective you will record progress on; you cannot record progress on an outcome. Vertex Case Manager uses the objective’s progress ratings to determine when the outcome has been achieved.
- In the Objectives section, click +New. A blank Objectives page displays.

-
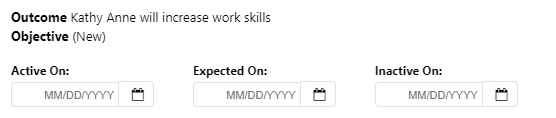
Enter: a. The Started On and Expected On date fields. If you enter a date in the future, you won’t be able to see that objective until the date has arrived. To see the objective before the date, select Inactive Objectives in the box to the left of the objective. b. Do not enter a date into the Ended On field until the consumer either meets or otherwise abandons the outcome. Entering an Ended On date prevents progress records to be entered after the date.
-
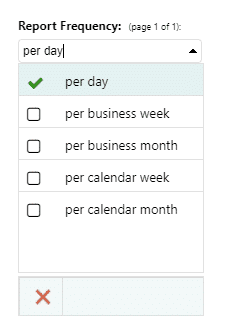
Enter: • A short description (Name) of the objective as well as the full Description of the objective. • Strategy to note how you will assist the consumer in achieving this objective. • Current Functioning to note how the consumer performs or behaves now. Think of this as the reason the consumer needs to work on the objective. • Measurement Scale Rating Scale you will use to rate the consumer’s performance on this objective. You will also want to enter the Target Measurement Rating Score and the Initial Measurement Rating Score which define the rating the consumer wants to achieve as well as where the consumer is now. • Successful for the day when section to determine when the objective is met for the day. You can choose that Any measurement rating or Every measurement rating for the day is equal to, not equal to, greater than, less than as well as other options compared to either the Initial Rating or the Target Rating. • Sequence represents the order that the objectives will be worked on. If there is only one objective, you should enter 1. • Reports Requested is used to specify how many progress records need to be done before the day or another time period can be signed. Reports Requested works together with Report Frequency.
-
If the Reports Requested is 1 and the Report Frequency is per day, then the day’s records for the consumer will not be able to be signed (finalized) until the progress record is added.
-
If the Report Requested is 2 and the Reports Frequency is per business week, then you’ll be able to sign the records each day if there are 2 progress records recorded up until Friday. If on Friday one or no progress records have been entered for that calendar week, then Friday’s records would not be able to be signed until the total of 2 progress records have been added.
- The per calendar week option assumes Saturday is the last day for checking. If the progress records for the week have not yet been entered, the person recording service on Saturday will have to enter the progress records before that day’s work can be finalized.
- The per business month uses the last business day as the checking date. This can be any day of the week depending on the month.
- The per calendar month option uses the actual last day of the month for checking.
-


-
-
- Objective Category to specify a type of objective for grouping such as hygiene, community, residential.
- Service the consumer is receiving when working on this objective.
-
Responsible Person of your staff whom is ultimately responsible for the consumer achieving this objective.
-
Use the Status field to note if the goal is In Process, Completed, or Abandoned.
-
Behavior Related or Other Work Related to specify the type of objective.
-
Your Objective is complete and will look like this:
