Working with Provider Review in Case Manager
- From your My Page, select the Provider Review Icon.

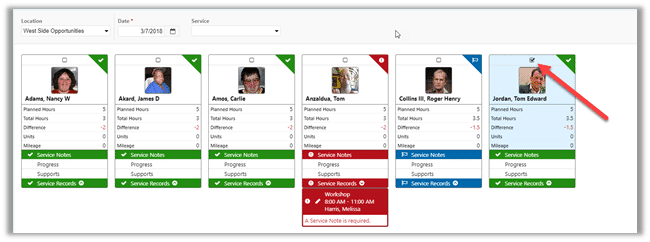
The consumers you worked with on the date displayed will display.

Red represents an Error and indicates there is a requirement that has not yet been fulfilled—like a missing Progress Rating or a Service Note.
Yellow represents Warning and indicates there is something that you should be aware of but you can continue forward—like the system was expecting the client to be there for 6.5 hours and they were only there for 3.
Green represents Ready indicates all requirements have been met and the records are ready to be signed.
Blue represents Signed and indicates the Provider has already signed the records and they are waiting for the Supervisors to Approve them.
Gray represents Completed and indicates the record has been Signed and Approved. If you are using integrated Service Billing, it is then the completed records are ready to be invoiced.
2. Above the consumers will be a row of action icons. The All icon will tell you how many records you have for the day in total. The Error, Warning, Ready and Signed indicators display how many service records you have at each status. Click any of the icons to access that group of records at any time.

3. Use the arrow buttons to move to Previous and Next pages, and to access the first page in the group or the last page in the filtered group.

4. If edits are required, click the image of the person to access the Documentation Review page.

5. Once you have completed your edits, click the check boxes above the image of each person and select the Sign or Approve icon.

You can also click the Select All button at the top and it will check mark the individuals for you. Once selected, click Sign or Approve and they are all moved to Completed status.
Records still at an error status will not be signed during this step. You must fix the error then Save and Sign the record.