Adding Services, Activities and Locations to Case Manager
Setup Services
Services are what you provide to your consumers and are what you bill for. Services are attached to the program that the consumer attends. In other words, the consumer receives services while attending the program. Case Manager needs to know what services are provided by each program.
- From the Menu, select Scheduling | Services.

- Click the green +New to add a new service.
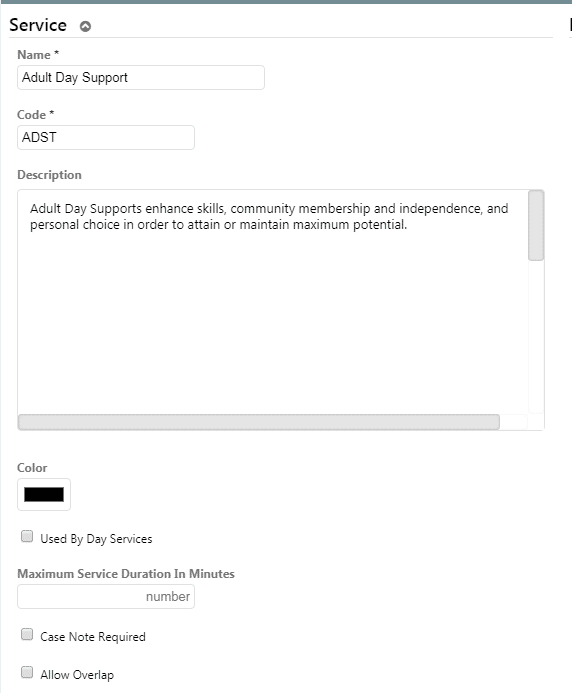
- Enter details as needed for your agency:
- Enter the Name of the service.
- Enter a Code for the service. It’s common to enter the billing code for this service or another code your providers will recognize during service entry.
- Enter a Description of the service.
- Select a Color that you’ll see when scheduling this service. The service color can help differentiating between services when viewing a schedule.
- Do not check Used by Day Service even though this is a day service. This is a special designation used by certain states and you’ll be notified when it’s appropriate to use this checkbox.
- Maximum Service Duration in Minutes is for future use. However, if you know that a service will only be delivered, for example, 120 minutes in a session, enter 120 or whatever value you’d like
- Click Case Note Required if you want to enforce the entry of a service note each time this service is delivered. Please note the provider will not be able to finalize his or her day until the case/service note is entered.
- Only click Allow Overlap when a service record’s time can overlap with another service. Please note use of allowing overlaps is rare as most person’s you serve can only be billed for one service at any given time.
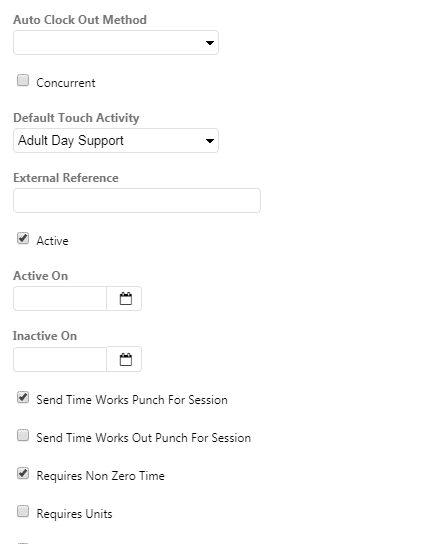
- Auto Clock Out Method is used in conjunction with Vertex’s Time and Attendance solution known as Timeworks Plus. Use of the field will be discussed as part of your Timeworks Plus implementation.
- If you are using Intuition – Touch for entering Vocational Time, you’ll use the Default Touch Activity to designate which activity/service the time will be displayed as in Vertex Case Manager.
- External Reference is not used at this time.
- Click Active to designate the service is currently being delivered at your agency.
- If you know the date your agency began offering the service, enter the Active On date.
- If you stop delivering a service at your agency, enter the last date the service was delivered in Inactive On.
- Send Time Works Punch for Session and Send Time Works Out Punch for Session are used in conjunction with Vertex’s Time and Attendance solution known as Time Works Plus. Use of the fields will be discussed as part of your Timeworks Plus implementation
- Click Requires Non-Zero Time if the service records require a start and stop time
- Click Requires Units if this service is billed as actual unit such as 1 unit of an assessment or a trip of transportation. Please note the provider will need to enter a value in Units when entering service time or the provider will not be able to finalize his or her day until the unit(s) are entered.
- Click Save to save the service.
Setup Activities
Activities are what you record time against. While the service might be Facility Habilitation – Group, your activities might be Interpersonal Communication Skills, Watercolors, or Music Appreciation. You can have as many activities as you like but you’ll need to have at least one activity for each service. If you have only one activity for the service, the activity will most likely have the same name as a service.
- From the Menu, select Scheduling | Services.

-
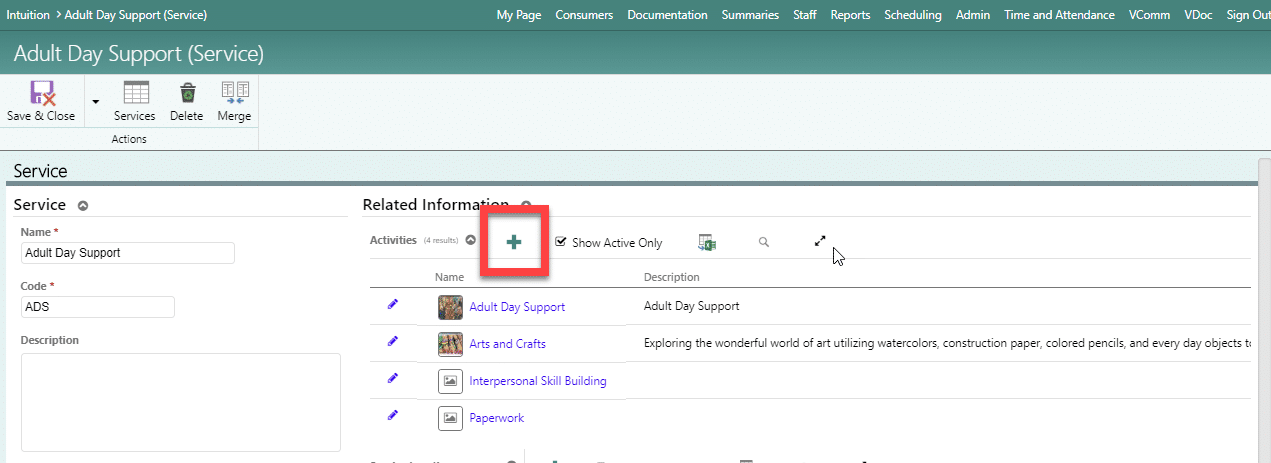
Click the pencil to the left of the first service that requires activities.
-
Click the green + (Add) in the Activities section.
-
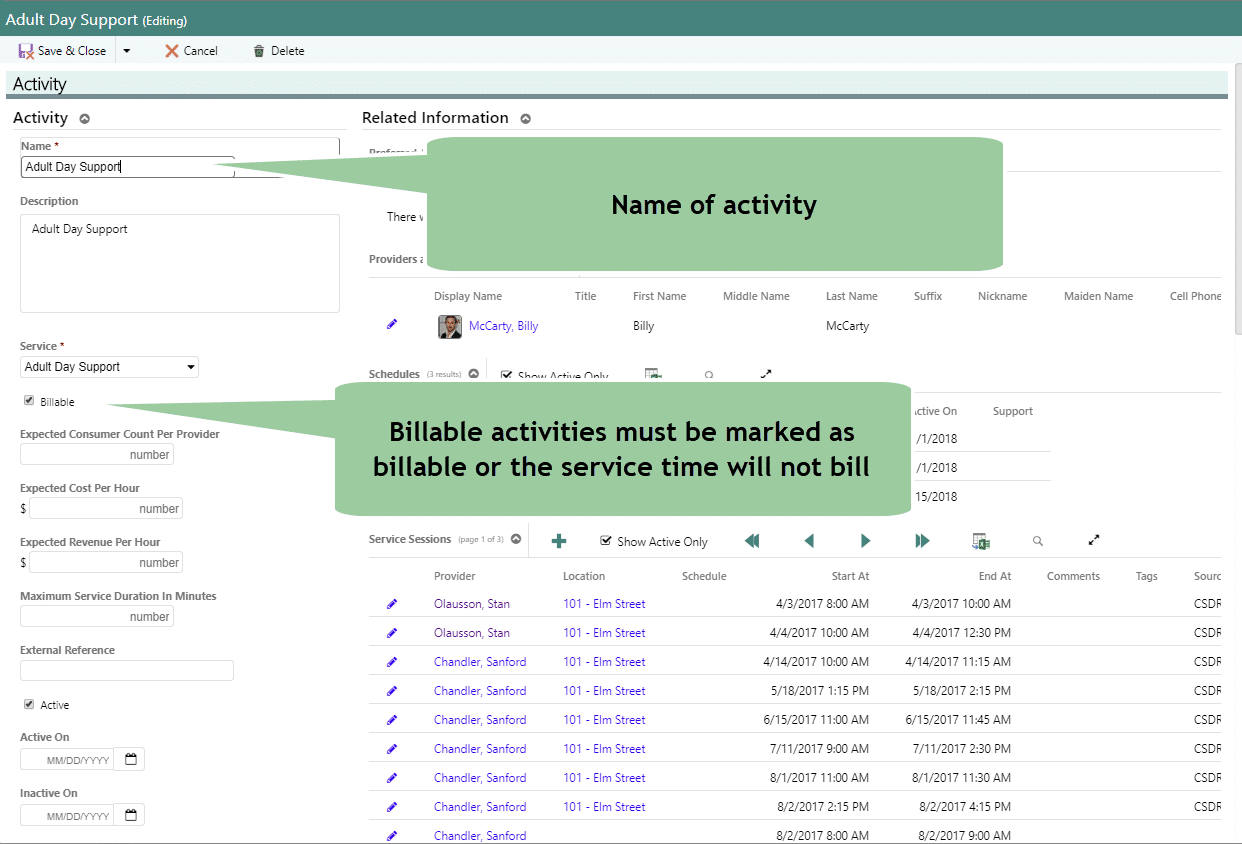
Enter the Name of the activity and be sure to check Billable for service time that is billable. All other information on the page is optional.
-
Click Save & New to add another activity for this service or Save & Close to end the activity entry for this service.
Locations
Services also need to be tied to Locations.
Locations are the physical places services are delivered. You’ll have at least one location but you might have several. If you have a building on the west side of town and another on the east side, you’ll have two locations. If you have Supported Employment programs, you might have people placed at dozens of places. Maintaining the list of all your employer’s locations could turn out to be a lot of work so instead of naming each employer’s physical location as a location, you might want to have one location for In the Field or Community Employer. For Residential programs, if you are managing homes, then you might want to have each home be a location. However, if you provide residential services in the homes of a lot of people (where you go to visit the consumer in his or her house) then you might want to have one location named Community Residence or the like.
- Once the Service is created, from the menu select Scheduling | Services as you did before.
- Click the pencil next to the Service to be edited.
-
On the right side of the screen, you will see a section labeled Locations. Select the green + and select a location from the dropdown list.

If the Location is not in the system, add in the same manner as you added a Service. From the menu select Scheduling | Location and add a new location.
